Virtual assistant
Installer
Getting Started Guide
Solutions and documentation structure
Equipment ordering and commissioning
General terms and conditions of sale and warranty
Wiring diagrams
Gateway and communication
Community - Electricity Metering - RCP
Heating - Heating metering and water
Mobility - EV Charging Stations
EBike - Recharge electric bikes
Washaccess - Collective laundry manager
Self-consumption optimization
Building energy monitoring
Equipment and installation
Charging infrastructure and relays
Metering infrastructure
Communication infrastructure
Climkit Gateway
4G Router
LAN Router
RS485-Ethernet Converter
Switch ethernet DIN POE
WiFi Network
MBus-RS485 Converter
Storage system (battery)
Configuration and commissioning
Commissioning
Getting Started Guide
Add a router to a site
Add a Climkit Gateway to a site
Electricity meter configuration
Charging station configuration
Configuration of heating and water meters (MBus)
Installation of Shelly relay meters
Optimization via EV relays and charging stations
Checking meter connection status
Advanced configuration
Configuration Gateway
RFID reader and relay meter configuration
IP network configuration and routers
RS485-Ethernet TCP/IP Converters
Configure Teltonika RUT241
Display configuration
Modbus Meter Configuration
Metering data processing
Manually read meter
Inepro PRO380 Meters and various
ABB Terra AC Charging Station Configuration
Wallbox configuration
Firewall rules for Climkit Gateway
Schneider EVlink Pro AC Charging Station Configuration
Zaptec Charging Station Configuration
Owner
Administrative setup
Getting started guide - administrative setup
Form - 1. Contact details
Form - 2. Solutions
Form - 3. Rates
Contract and documents to complete
Owner account
Consumer information flyers
Online access, RFID badge and charging stations
FAQ and other information
Resident
Platform
Platform access
Terminology
Site
Parameters
Creation/edit of a note or to-do item
Closing an open issue
Site statuses
Add/Modify building(s)
The steps for setting up a site
Delete/deactivate a site
Add/Edit Equipment(s)
Modify site basic information
Equipment
Add/modify a gateway
Add/modify a router
Add/modify an electricity meter
Bulk meter insertion
Mass assigning meters to a gateway
Add/edit a distribution zone
Add/modify a charging station
Add/modify a thermal or water meter
Add/edit a DSO meter (FTP transfer)
Remote connection to a Climkit gateway
Administration
Stakeholders
Financial conditions
Visualizing Site Management Conditions
Activating/Deactivating a Solution
Configuration of the Operating Method
Visualizing Financial Conditions
Creation/editing/addition of a financial condition
Removal of a financial condition
Accounts
Create a consumer account
Create a contact
View and download account invoices
Send platform access to a contact
Add/modify billing address
Link an existing account to a site
Changing the correspondence method
Rates and billing points
Creating/editing a billing point
Register a move (relocation)
Account assignment to a billing point
Add/edit default charge advance payment for a billing point
View site consumption rates
Consumption Rate Edition
Creation/editing of a consumption tariff
Creation/editing of a Tariff component
View fixed rates and subscriptions
Customize invoice position labels/titles
View Financial conditions billed at billing points
RFID badges
Accounting
Tools
Meter control
Visualization
Expense accounts
Introduction to the Expense Statement Tool
Create/edit an expense accounting period
Modify expense statement settings
Add/edit a overhead expense invoice on an expense statement
Edit collected advance payments of an expense statement
Specifics of heating and hot water production costs
Check and download meter readings for the cost accounting period
Allocate expenses and generate expense statements
Exporting individual consumptions for the billing period
API
- Categories
- Installer
- Configuration and commissioning
- Commissioning
- Installation of Shelly relay meters
Installation of Shelly relay meters
Updated
by Christopher Gautschi
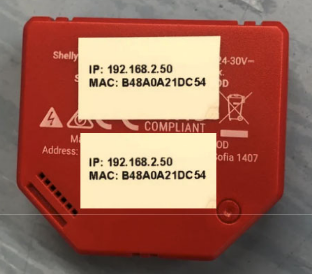
Each Shelly relay meter comes with two labels located on the back of the device.

Steps to follow for each socket equipped with a Shelly:
- Peel off one of the two labels located on the back of the Shelly.
Leave the other label on the Shelly; it is necessary for on-site identification.
- Stick the peeled-off label onto an A4 sheet, clearly specifying:
- The socket number where the Shelly is installed.
- Take a clear photo of the entire sheet.
- Send the photo to Climkit via email to enable remote platform configuration.
Example of a completed sheet:
Socket | Label |
Socket 1 | [Label 1] |
Socket 2 | [Label 2] |
Important:
- A mismatch between labels and sockets will lead to errors in platform configuration.
- Each Shelly must be clearly identified, and the information must be legible on the sent photo.
