Installer
Planning
Installer getting started guide (read first)
Global planning of a Climkit site
Climkit site implementation process
Plan the connection of the Climkit Gateway and network connectivity
Plan electricity management (RCP, RCPv and LEC)
Plan energy optimization and storage
Plan the management of electric vehicle charging stations
Plan the management of heating, water and ancillary costs
Plan collective laundry management
Plan eBike charging management
General terms and conditions of sale
Platform configuration
Request for an Installer account
Creation of a new site
Add the router (4G or LAN)
Adding the Climkit Gateway
Adding electricity meters
Save the photovoltaic installation information
Save battery information
Adding charging stations
Add the OCPP Remote electric vehicle charging station
Add the 4-relay I/O module
Add RFID readers
Adding heat and water meters
Installation and connection
Install the 4G Router
Install the LAN router
Install the Climkit Gateway
Install the RS485-Ethernet converter
Install the M-Bus converter
Install the standard Ethernet switch
Install the PoE Ethernet switch
Install the Wi-Fi access points
Install electricity meters
Install the charging stations
Install heat and water meters
Install the RFID reader
Install the three-phase Relay meter
Install the Shelly relay meter
Install the 4-relay I/O module
Verification and testing
Owner
Administrative setup
Getting started guide - Administrative setup
Form - 1. Contact details
Form - 2. Solutions
Form - 3. Billing rates
Contract and documents to complete
Online account for owners
Information flyers for consumers
Online access, RFID badge and charging stations
FAQ and other information
Resident
Account and app
Electricity invoice
Electric vehicle charging station
Building laundry room
Electric vehicle charging (eBike)
Platform
Platform Access
Terminology
Accounts and contacts
Site
Settings
Creation/editing of a note or an issue to be processed
Close an issue to be processed
Site statuses
Add/Modify the building(s)
Steps for commissioning a site
Delete/deactivate a site
Add/Modify equipment
Edit the basic information of a site
Equipment
Add/modify a gateway
Add/modify a router
Add/modify an electricity meter
Bulk insert meters
Bulk assign meters to a gateway
Add/modify a distribution zone
Add/modify a charging station
Add/modify a thermal or water meter
Add/edit a Distribution system operator (DSO) meter (FTP transfer)
Connecting remotely to a Climkit gateway
Administration
Stakeholders
Management terms
View site management conditions
Activation/deactivation of a solution
Configuration of the operating method
Visualize the financial conditions
Creation/edition/addition of a financial condition
Deleting a financial condition
Accounts
Create a consumer account
Create a contact
View and download the invoices of an account
Send Platform Access to a contact
Add/modify the billing address
Link an existing account to a site
Change the correspondence method
Rates and billing points
Creation/editing of a billing point
Record a move (transfer)
Assignment of an account to a billing point
Add/modify the default charge advance payment for a billing point
View the rates of the consumption site
Editing a consumption tariff
Creation/edition of a consumption billing rate
Creation/editing of a consumption tariff component
View fixed rates and subscriptions
Customize invoice line item labels/titles
View the Financial conditions billed to the Billing points
RFID badges
Accounting
Tools
Meter inspection
Visualization
Expense statements
Introduction to the Expense statement generation tool
Create/edit an accounting period for expense statements
Modify the expense statement settings
Add/modify a general expense supplier invoice for an expense statement
Edit the collected advance payments of an expense statement
Particularity of room heating and hot water production fees
Verify and download the meter readings for the expense statements period
Perform the cost allocation and generate the expense statements
Export individual consumption for the expense statement period
API
- Categories
- Installer
- Platform configuration
- Adding electricity meters
Adding electricity meters

This article describes the configuration of electricity meters on the Climkit platform.
For connection planning, or for onsite equipment installation, refer to the links at the end of the article.
Registration of electricity meters
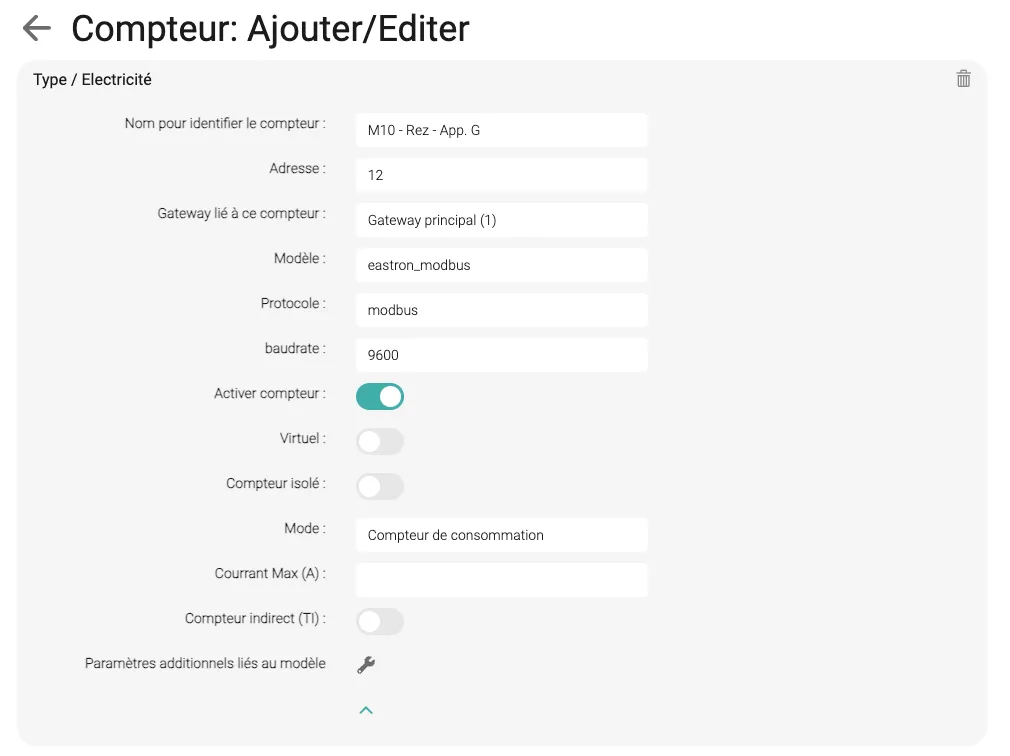
Log in to the Climkit online platform (app.climkit.io), and select the corresponding site. Under Meters, create the meters one by one by clicking on the "+" and entering:
Name: Name the meter according to its labeling as it appears in the electrical panel and diagrams, indicating the consumer it corresponds to.
Example: The meter labeled "3P7" on the electrical panel, which corresponds to apartment No. 203, will be named: 3P7 – Apartment 203.
Address: Set the primary Modbus address for each meter, ideally according to the following principle:- Input meter: 10
- Production meter(s): 101, 102, ...
- Consumption meter(s): 11, 12, ...
- Battery meter(s): 120, 121, ...
Gateway: Select the Gateway to which the meters are connected ( EQUIPMENT > Communication )Mode: Depending on the meter type:- introduction: general Input meter for the site
- consommation: Consumer meter (apartments, common areas, charging station...)
- production: connection of the photovoltaic inverter
- batterie: AC battery
Max Current (A): Amperage of the connection (e.g. 25 A).- Other parameters that are generally not necessary to modify:
Model: eastron_modbusProtocol: modbusBaudrate: 9600