Virtual assistant
Installer
Planning
Installer startup guide (read first)
Global planning of a Climkit site
Process for setting up a Climkit site
Plan the connection of the Climkit Gateway and network connectivity
Schedule the electricity management
Plan the management of electric vehicle charging stations
Schedule the management of heating costs, water, and ancillary costs
Plan collective laundry management
Plan to manage eBike charging
General terms and conditions of sale
Platform configuration
Request for an Installer account
Creation of a new site
Add the router (4G or LAN)
Adding the Climkit Gateway
Adding electricity meters
Save the Photovoltaic installation information
Save the battery info
Adding charging stations
Add the OCPP Remote Electric vehicle charging station
Add the 4-relay I/O module
Adding RFID readers
Adding heat and water meters
Installation and connection
Install the 4G Router
Install the LAN router
Installing the Climkit Gateway
Install the RS485-Ethernet converter
Install the M-Bus converter
Install the standard Ethernet switch
Install the PoE Ethernet switch
Install Wi-Fi Access points
Install the electricity meters
Install the charging stations
Install the heat and water meters
Install the RFID reader
Install the three-phase Relay meter
Installing the Shelly relay meter
Install the 4-relay I/O module
Verification and testing
Owner
Administrative setup
Getting started guide - administrative setup
Form - 1. Contact details
Form - 2. Solutions
Form - 3. Billing rates
Contract and documents to be completed
Online account for owners
Information flyers for consumers
Online Access, RFID badge and charging stations
FAQ and other information
Resident
Account and app
Electricity invoice
Electric vehicle charging station
Building laundry room
Electric vehicle charging (eBike)
Platform
Platform Access
Terminology
Site
Settings
Creation/editing of a note or an issue to be addressed
Close an issue to be processed
Site statuses
Add/Modify building(s)
The steps for setting up a site
Delete/deactivate a site
Add/Edit equipment
Edit the basic information of a site
Equipment
Add/modify a gateway
Add/modify a router
Add/modify an electricity meter
Bulk insert meters
Bulk assign meters to a gateway
Add/modify a distribution zone
Add/edit a charging station
Add/modify a thermal meter or water meter
Add/edit a DSO meter (FTP transfer)
Connect remotely to a Climkit gateway
Administration
Stakeholders
Management terms
View the site management conditions
Enabling/disabling a solution
Configuration of the operating method
Visualize the financial conditions
Creation/edition/addition of a financial condition
Deletion of a financial condition
Accounts
Create a consumer account
Create a contact
Visualize and download account invoices
Send Platform Access to a contact
Add/modify the postal billing address
Link an existing account to a site
Change the correspondence method
Rates and billing points
Creation/editing of a billing point
Registering a move (transfer)
Assignment of an account to a billing point
Add/modify the default charge advance payment of a billing point
View site billing rates
Editing a consumption tariff
Creation/editing of a consumption tariff
Creation/editing of a consumption tariff component
View fixed rates and subscriptions
Customize invoice line item labels/titles
View the Financial conditions billed to the billing points
RFID badges
Accounting
Tools
Meter inspection
Visualization
Expense statements
Introduction to the Expense statement generation tool
Create/edit an accounting period for expense statements
Modify the expense statements settings
Add/modify a general invoice for an expense statement
Edit the advance payments collected for an expense statement
Special feature of room heating and hot water production fees
Verify and download meter readings for the expense statement period
Make the cost allocation and generate the expense statements
Export individual consumptions for the expense statements period
API
Table of Contents
- Categories
-
- Gateway Configuration
Gateway Configuration
1. Configuration Web Server
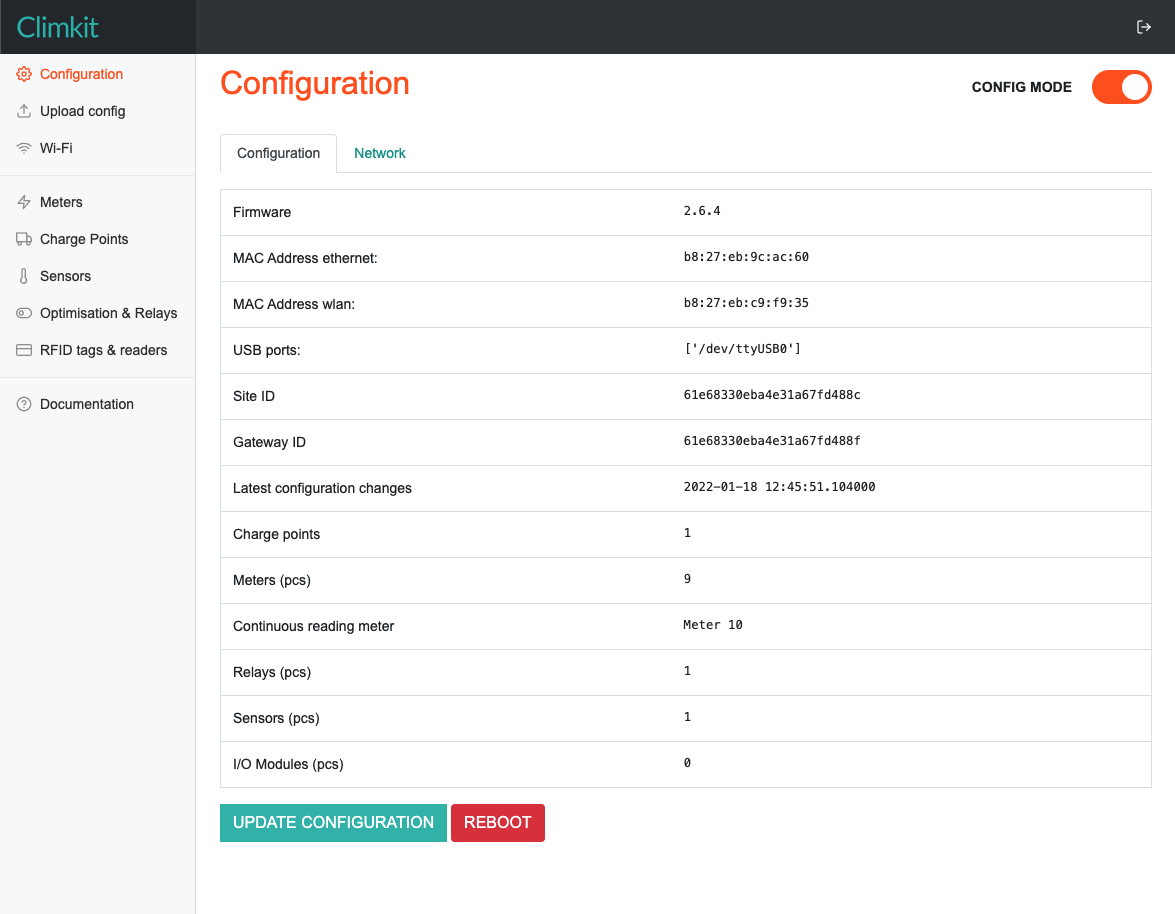
The Climkit Gateway possesses an internal web server used to check the configuration and the connection of the equipment.
However, everything is configured on the main portal app.climkit.io. The Gateway simply imports its configuration from the portal.
You can connect to the web server using the local URL available on the portal under Configuration > Gateway > Local Gateway Access. Or use its local IP address with port 8080 (e.g., 192.168.2.10:8080).
The password is available under Configuration > Gateway > Configuration server password.
The Gateway regularly checks for configuration changes but it is possible to immediately import the new configuration by clicking the UPDATE CONFIGURATION button.
Configuration Mode
Activate the configuration mode under Configuration > Config mode.
When activated, CONFIG MODE stops all services and allows you to manually interact with the equipment, such as meter reading or relay switching.
Remember to deactivate it when you are finished.
Once deactivated, all services are restarted and the Gateway should operate normally.
Services
The Gateway can simultaneously run the following services depending on the main configuration:
- Meter reading: used to regularly read meters and export their data to the Climkit Cloud.
- Charging station: used to interact with EV charging stations (charge management and authentication).
- Sensor reading: used to read sensors and export their data to the Climkit Cloud.
- Optimization: algorithm used to optimize self-consumption of solar electricity.
- Card readers: used to interact with RFID readers and open or close relays.
You can consult their logs and status (✅ /❌) under their respective tab on the configuration web server.
Restart all services by activating and deactivating the Config mode.
Meters Tab
The Meters tab with CONFIG MODE activated is used to manually interact with Modbus and Mbus meters.
It can also be used to manually change the primary Modbus or Mbus address of a device.
It can also be used to manually read a Modbus register of a connected device.
2. Upload the configuration file
Upload the installation configuration file
- Download the installation JSON configuration file from the Climkit portal under Configuration > Gateway.
- Connect the Gateway to your local router with an Ethernet cable and plug the Gateway into its power supply.
- Wait a few minutes, then open a web browser and go to the local configuration server at http://climkit.local:8080/ (or the local IP, e.g., 192.168.1.10:8080).
You must connect with the default credentials:
USERNAME: "config"
PASSWORD: "climkit"
- Go to Upload Config and select the JSON configuration file, then click UPLOAD.
- Once configuration is complete and successful, restart the gateway and wait 5 minutes.
- It is now possible to connect to the local configuration server with the IP address or the new local URL available under: Configuration --> Gateway --> Local configuration server.
USERNAME: "config"
PASSWORD: The installation's own "Config Server password"
It is also possible to access the installation remotely with the "Remote config server" link.
Note: The connection may take up to 5 minutes to become available.
3. Troubleshooting
When connected to an internet connection, the Gateway automatically communicates with Climkit servers.
Here is a quick guide on how to resolve most connection issues.
Internet Connection
4G Router
Check with a computer that the router is connected to the Internet.
Check the RJ45 cables.
If there is no Internet, three explanations are possible:
- Faulty router
- Faulty router Ethernet port
- Deactivated SIM card (4G connection)
Local LAN Router
Check the connection between the router and the Gateway (Ethernet cables, switch, etc.).
Do not use powerline adapters (Ethernet over power lines).
RS485 or Mbus Problems
If not all meters are read:
- Ensure that the meters are addressed.
- Check that the Modbus parameters are correctly set (address, parity, baud rate).
- Verify with a tester that there is no faulty contact on the bus between A, B, and GND.
- Check that all cables are properly connected and making contact. Sometimes, if the wire is poorly inserted, it may be crimped over the insulation and fail to make contact.
- To isolate the problem, unplug the entire bus and gradually connect the meters, checking that they are read one by one as they are added.
- Inquire if all meters are wired in series and not in a star configuration.
- Check that the RS485/USB adapter is not damaged. Verify that the correct colors of the RS485/USB adapters are being used (A=orange, B=yellow, GND=black).
If some meters are not read:
- Check that the circuit breaker is not faulty
- Check that a wire on the bus is not disconnected, which would disconnect the rest.
- Check the bus address of the meter(s) in question.