Virtual assistant
Installer
Planning
Installer Quick Start Guide (read first)
Overall Climkit Site Planning
Process for setting up a Climkit site
Planning the Climkit Gateway connection and network connectivity
Planning electricity management
Planning electric vehicle charging station management
Planning heating, water, and ancillary cost management
Planning collective laundry management
Planning recharge management for eBikes
General Terms and Conditions of Sale
Platform Configuration
Request for an installer account
Creating a new site
Add the router (4G or LAN)
Adding the Climkit Gateway
Adding electricity meters
Registering the photovoltaic installation information
Save battery info
Adding charging stations
Add OCPP Remote charging station
Add the 4 relay I/O module
Adding RFID readers
Adding heat and water meters
Installation and connection
Install the 4G Router
Install the LAN router
Installing the Climkit Gateway
Install the RS485-Ethernet converter
Install the M-Bus converter
Install the standard Ethernet switch
Install the PoE Ethernet switch
Install Wi-Fi access points
Installing electricity meters
Install charging stations
Install the heat and water meters
Install the RFID badge reader
Install the three-phase relay meter
Install the Shelly relay meter
Install the 4-relay I/O module
Verification and testing
Owner
Administrative setup
Getting Started Guide - administrative setup
Form - 1. Contact Information
Form - 2. Solutions
Form - 3. Rates
Contract and documents to complete
Owner online account
Consumer information flyers
Online access, RFID badge and charging stations
FAQ and other information
Resident
Account and app
Electricity Invoice
Electric vehicle charging station
Collective laundry room
Electric vehicle (eBike) charging
Platform Components
Platform Access
Terminology
Site
Settings
Creating/editing a note or a to-do item
Closing an issue to be processed
Site Status
Add/Modify building(s)
Steps for setting up a site
Delete/deactivate a site
Add/Modify equipment(s)
Modify basic site information
Equipment
Add/modify a gateway
Add/modify a router
Add/modify an electricity meter
Bulk insertion of meters
Bulk assigning meters to a gateway
Add/edit a distribution zone
Add/modify a charging station
Add/modify a thermal or water meter
Add/edit a GRD meter (FTP transfer)
Remote connection to a Climkit gateway
Administration
Stakeholders
Financial conditions
Visualize site management conditions
Activating/deactivating a solution
Operating method configuration
Viewing financial conditions
Creation/editing/addition of a financial condition
Deleting a financial condition
Accounts
Create a consumer account
Create a contact
View and download invoices for an account
Send platform access to a contact
Add/modify billing address
Link an existing account to a site
Changing the correspondence method
Billing and prices
Creation/editing of a billing point
Registering a move (transfer)
Assigning an account to a billing point
Add/modify the default charge advance payment for a billing point
View site consumption rates
Consumption rate creation
Creating/editing a consumption rate
Creation/editing of a tariff component
View fixed rates and subscriptions
Customizing invoice/statement position labels
See Financial Conditions billed at billing points
RFID badge
Accounting
Tools
Meter control
Visualization
Expense breakdowns
Introduction to the Expense statements tool
Create/edit an accounting period
Modifying expense statement settings
Add/edit a general expense invoice in an expense statement
Edit collected advance payments from an expense statement
Specifics of heating and hot water fees
Check and download meter readings for the cost accounting period
Distribute costs and generate expense statements
Exporting individual consumption data for the fee statement period
API
- Categories
-
- Building energy monitoring
Building energy monitoring
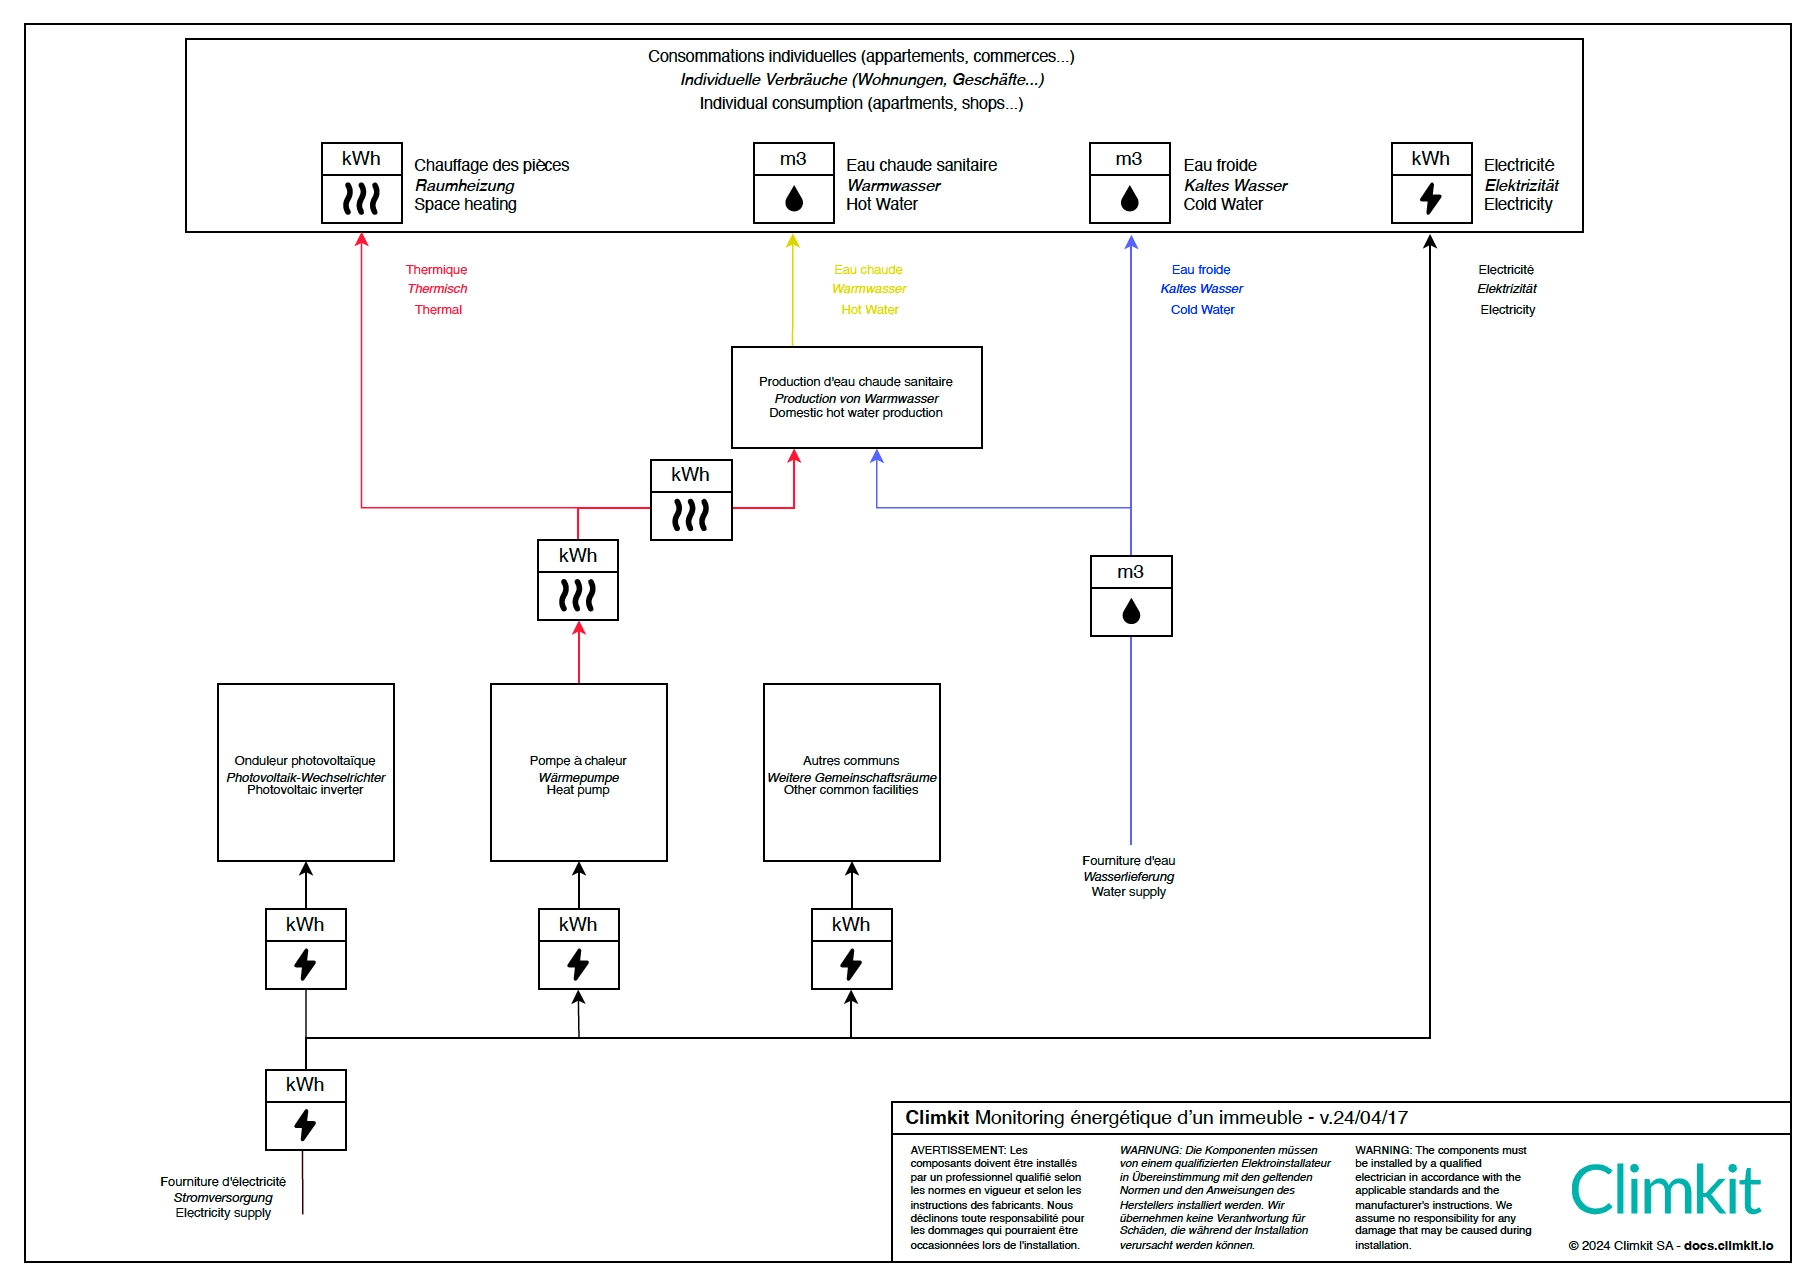
1. General principle diagram
To monitor all energy and water flows in a building, the meters indicated in the diagram below must be provided:

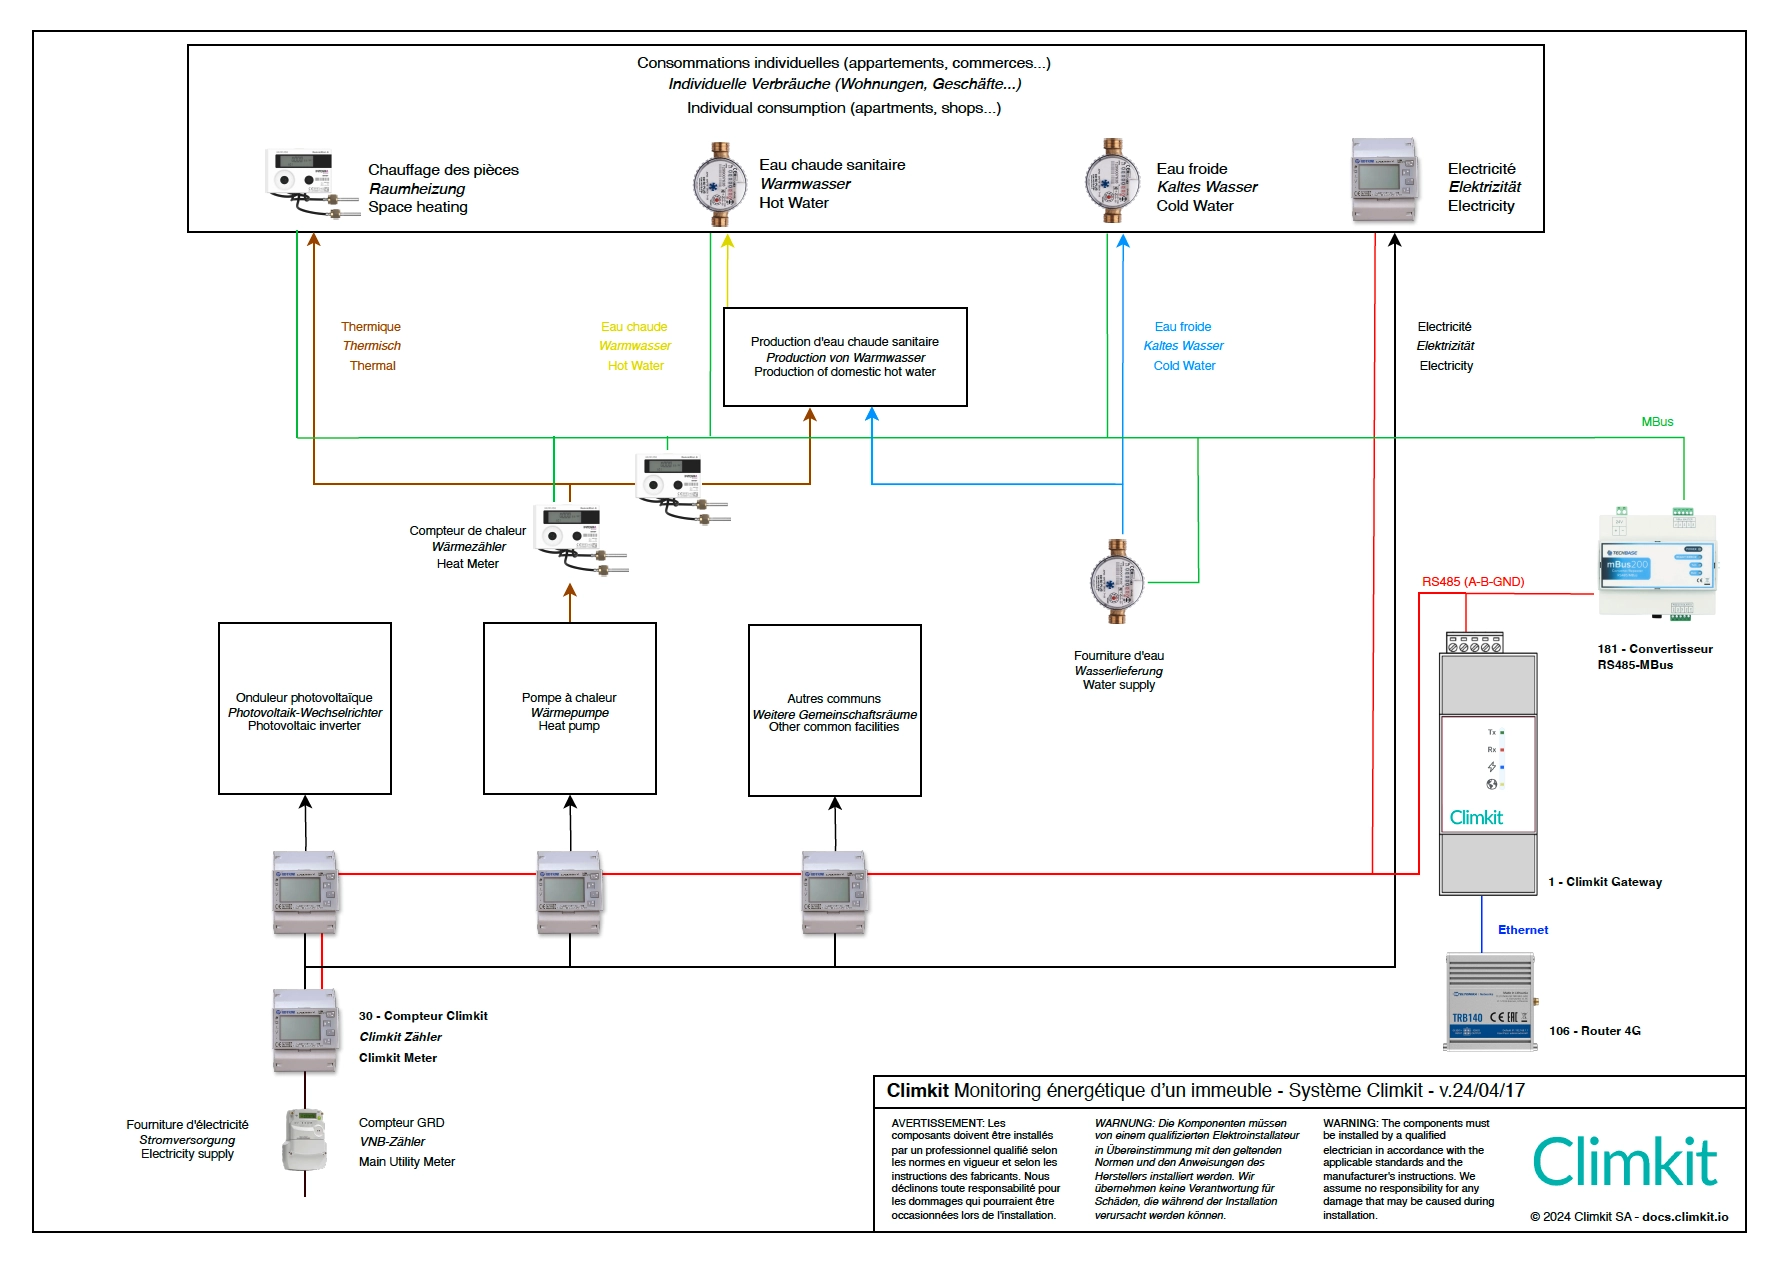
2. Principle diagram with Climkit equipment

Technical description
The instructions below should be used for calls for tenders or during project planning.
1. Electricity monitoring:
- Main meter: Electricity distribution is based on the self-consumption grouping (RCP) model. There is therefore an official metering point at the building entrance equipped with the meter from the distribution system operator (DSO). A private meter is installed downstream of this to measure the energy drawn and fed back.
- Individual meters: Each apartment, commercial space, office, common areas, and other equipment such as lighting, heat pumps, parking areas, electric charging stations, and ventilation are equipped with their own private electricity meter.
- Photovoltaic (PV) installations: A private electricity meter must be installed on each PV inverter output to measure the production of each PV installation. Note: If the total power of the installations exceeds 30 kVA, a DSO meter must also be installed on each output.
- Private meter characteristics: The private meters used must be DIN rail type, MID certified, and operate using the Modbus communication protocol via an RS485 data bus (product code: 30). For installations over 80A, use indirect meters with current transformers (CTs) sized according to the amperage of the circuit being measured (product code: 34).
- Meter communication: The RS485 bus connects each meter in series starting from the Climkit gateway (product code: 1), installed in the electrical panel near the meters.
- Internet connection: A 4G router (product code: 106) is installed and connected to the Climkit gateway via an RJ45 Ethernet cable. If the 4G signal is insufficient in the electrical room, provide for relocating the 4G antenna or installing an outdoor IP65 antenna (product code: 102030), using a 5m or 10m extension cable if necessary (product code: 102010).
- Meter installation and identification: Meters must be installed according to the manufacturer's specifications. Particular attention is required for indirect meters to ensure their correct operation. Meters are configured with a unique primary Modbus address (1 to 254). Provide a simplified metering diagram, meter registration on the Climkit portal, and precise labeling identifying each meter according to the measured entity designation (apartment numbers, common area identification, etc.) to facilitate management and billing.
2. Thermal and water monitoring:
- Individual consumption measurement: All consumers (apartments, shops, offices, etc.) are equipped with their own individual meters to measure their consumption of heating, domestic hot water (DHW), and domestic cold water (DCW) and potentially cooling. The DHW and DCW supplies for common areas (such as laundries, irrigation, etc.) are also all equipped with meters.
- Heat meter at the heat pump outlet: Install a heat meter at the outlet of the heat pump (HP) to measure the total thermal energy produced. Note: If the HP has a high and low-temperature output, install a meter on each output.
- Heat meter at the DHW tank inlet: install a heat meter at the inlet of the domestic hot water tank to measure the energy used for DHW production.
- Cold water meter: A cold water meter must be installed on the building's water supply, downstream of the official supplier's meter (municipal industrial services).
- Technical characteristics of heat and water meters: Meters must be MID certified and equipped with a wired M-Bus communication module.
- Meter communication: The M-Bus bus is connected to an M-Bus-RS485 converter (product code: 182), which is itself connected to the Climkit gateway, eliminating the need for an M-Bus central unit.
- Internet connection: See Electricity Monitoring above
- Installation and identification: Meters must be commissioned by their supplier. Commissioning protocols identifying each meter according to the measured entity designation (apartment numbers, common area identification, etc.) will be provided to the site manager and Climkit for integration into the Climkit portal and configuration of meter reading via the Climkit gateway.
