Virtual assistant
Installer
Getting Started Guide
Solutions and documentation structure
Equipment ordering and commissioning
General terms and conditions of sale and warranty
Wiring diagrams
Gateway and communication
Community - Electricity Metering - RCP
Heating - Heating metering and water
Mobility - EV Charging Stations
EBike - Recharge electric bikes
Washaccess - Collective laundry manager
Self-consumption optimization
Building energy monitoring
Equipment and installation
Charging infrastructure and relays
Metering infrastructure
Communication infrastructure
Climkit Gateway
4G Router
LAN Router
RS485-Ethernet Converter
Switch ethernet DIN POE
WiFi Network
MBus-RS485 Converter
Storage system (battery)
Configuration and commissioning
Commissioning
Getting Started Guide
Add a router to a site
Add a Climkit Gateway to a site
Electricity meter configuration
Charging station configuration
Configuration of heating and water meters (MBus)
Installation of Shelly relay meters
Optimization via EV relays and charging stations
Checking meter connection status
Advanced configuration
Configuration Gateway
RFID reader and relay meter configuration
IP network configuration and routers
RS485-Ethernet TCP/IP Converters
Configure Teltonika RUT241
Display configuration
Modbus Meter Configuration
Metering data processing
Manually read meter
Inepro PRO380 Meters and various
ABB Terra AC Charging Station Configuration
Wallbox configuration
Firewall rules for Climkit Gateway
Schneider EVlink Pro AC Charging Station Configuration
Zaptec Charging Station Configuration
Owner
Administrative setup
Getting started guide - administrative setup
Form - 1. Contact details
Form - 2. Solutions
Form - 3. Rates
Contract and documents to complete
Owner account
Consumer information flyers
Online access, RFID badge and charging stations
FAQ and other information
Resident
Platform
Platform access
Terminology
Site
Parameters
Creation/edit of a note or to-do item
Closing an open issue
Site statuses
Add/Modify building(s)
The steps for setting up a site
Delete/deactivate a site
Add/Edit Equipment(s)
Modify site basic information
Equipment
Add/modify a gateway
Add/modify a router
Add/modify an electricity meter
Bulk meter insertion
Mass assigning meters to a gateway
Add/edit a distribution zone
Add/modify a charging station
Add/modify a thermal or water meter
Add/edit a DSO meter (FTP transfer)
Remote connection to a Climkit gateway
Administration
Stakeholders
Financial conditions
Visualizing Site Management Conditions
Activating/Deactivating a Solution
Configuration of the Operating Method
Visualizing Financial Conditions
Creation/editing/addition of a financial condition
Removal of a financial condition
Accounts
Create a consumer account
Create a contact
View and download account invoices
Send platform access to a contact
Add/modify billing address
Link an existing account to a site
Changing the correspondence method
Rates and billing points
Creating/editing a billing point
Register a move (relocation)
Account assignment to a billing point
Add/edit default charge advance payment for a billing point
View site consumption rates
Consumption Rate Edition
Creation/editing of a consumption tariff
Creation/editing of a Tariff component
View fixed rates and subscriptions
Customize invoice position labels/titles
View Financial conditions billed at billing points
RFID badges
Accounting
Tools
Meter control
Visualization
Expense accounts
Introduction to the Expense Statement Tool
Create/edit an expense accounting period
Modify expense statement settings
Add/edit a overhead expense invoice on an expense statement
Edit collected advance payments of an expense statement
Specifics of heating and hot water production costs
Check and download meter readings for the cost accounting period
Allocate expenses and generate expense statements
Exporting individual consumptions for the billing period
API
- Categories
- Installer
- Configuration and commissioning
- Advanced configuration
- Inepro PRO380 Meters and various
Inepro PRO380 Meters and various
 Updated
by Nicolas Vodoz
1. Meter Inepro PRO380
Modbus Addressing
- Navigate with the right button until "Pro-2".
- Press and hold the right button for 3 seconds to access the menu.
- Under "addr", press the right button for 5 seconds to enter programming mode.
- Edit and confirm each digit by pressing and holding both buttons for 3 seconds.
- Exit the menu by pressing the left button for 3 seconds.

CT Ratio (PRO380-CT only)
- Switch on the meter. For a few seconds, the message "SEt Ct" is displayed, followed by "Ct5 0005".

- Select the secondary current Ct5 (for CTs /5A) on the left side of the dial, then confirm by pressing both buttons for 3 seconds.
- On the right side of the dial, enter the primary current (e.g., 0300 for 300A CTs) and confirm each digit by pressing both buttons for 3 seconds. Warning: this can only be done once. If an error occurs, the meter must be replaced.
- Done! The CT ratio is saved.
Example video for 300/5A CTs
2. Orno OR-WE-516 and Polier MTR80LMOD Meter
Modbus Addressing
It is not possible to change the primary Modbus address of this type of meter via the context menu.
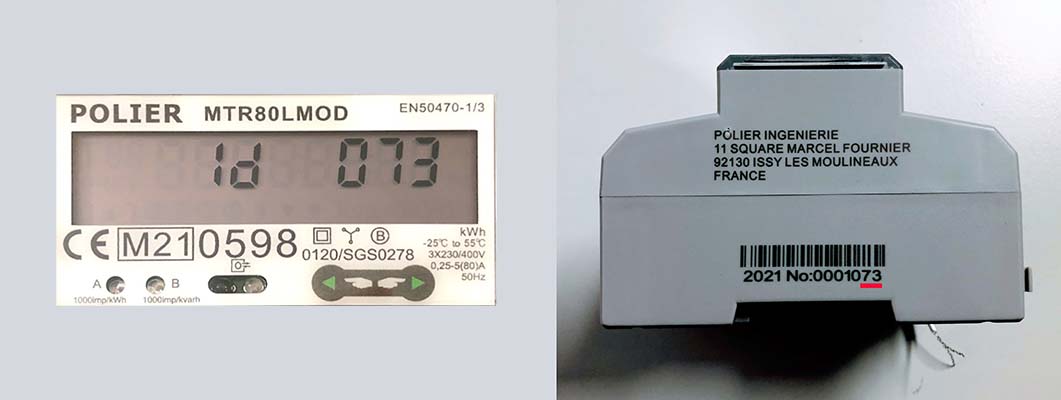
The default address corresponds to the last 3 digits of the meter's serial number.
It is also possible to obtain the address via the meter's context menu. The meter below has address 73.

During commissioning, it is therefore necessary to note this number along with the meter location and enter them into the portal.
