Virtual Assistant
Contractor
Getting started
Solutions and Documentation Structure
Material ordering and commissioning
General Sales Terms and Conditions and Warranty
Connection diagrams
Gateway and Communication
Community - Electrical Metering - RCP
Heating - Heating and Water Metering
Mobility - EV Charging Stations
Washaccess - Laundry Manager
EBike - Charging Electric Bicycles
Optimization of self-consumption
Energy monitoring of the building
Equipment and installation
Gateway Climkit
4G Router
LAN Router
RS485-Ethernet Converter
Switch ethernet DIN POE
WiFi Network
Electric Meters
MBus-RS485 converter
Heating & Water Meters
EV Charging Stations
Relay I/O Module
RFID Readers
Relay Meters
Commissioning
Configuration and commissioning
Start-Up Guide for Commissioning
Add a router to a site
Add a Climkit Gateway to a Site
Configuration of Electric Meters
Charging Station Configuration
Configuration of heating and water meters (MBus)
Optimization through relays and EV charging stations
Verification of Meter Connections
Advanced Configuration
Gateway Configuration
Cloud Gateway Configuration (MQTT)
RFID Reader Configuration
IP Network Configuration & Routers
RS485 to Ethernet TCP/IP Converters
Configure Teltonika RUT241
Configuring Display Screens
Modbus Meter Configuration
Data Counting Processing
Meter Read Manually
Inepro PRO380 Meters and Various
Configuration of ABB charging station
Wallbox Configuration
Configuration of Schneider EVlink Pro AC charging station
Zaptec Terminal Configuration
Property Owner
Administrative Setup
Getting Started Guide - Administrative Setup
Form - 1. Contact Details
Form - 2. Solutions
Form - 3. Rates
Contract and documents to complete
Online Account for Homeowners
Information Flyers for Residents
Online Access, RFID Badge & Charging Stations
FAQ & other Information
Resident
Platform
Access to the platform
Terminology
Site
Parameters
Modify the data validation schema for counting
Creation/Editing of a Note or an Issue to be Addressed
Close an issue to be addressed
The states of a site
Add/Edit Building(s)
The steps to set up a website
Remove/Disable a Site
Add/Edit Equipment(s)
Edit Basic Site Information
Equipment
Add/Modify a Gateway
Add/Edit a Router
Add/Modify an Electricity Meter
Mass Insertion of Meters
Bulk Assign Counter to a Gateway
Add/modify a distribution area
Add/Modify a Charging Station
Add/Modify a Thermal or Water Meter
Add/Edit a GRD Counter (FTP Transfer)
Connecting Remotely to a Climkit Gateway
Administration
Speakers
Management Conditions
Visualizing Site Management Conditions
Activation/Deactivation of a Solution
Configuration of the Operating Method
Visualizing Financial Conditions
Creation/Editing/Adding a Financial Condition
Removal of a financial condition
Accounts
Create a Consumer Account
Create a contact
View and Download Invoices from an Account
Send platform access to a contact
Add/modify billing address
Link an Existing Account to a Site
Change the Matching Method
Rates and Billing Points
Creation/Editing of a Billing Point
Registering a Move (Transfer)
Account allocation to a billing point
Add/modify the default charge deposit of a billing point
See the prices on the consumption site
Editing a consumption rate
Creation/Editing of a Consumption Rate
Creation/Editing of a Consumption Rate Component
See Fixed Rates and Subscriptions
Customize Invoice Line Item Labels/Titles
See the Financial Conditions Invoiced at the Billing Points
RFID Badges
Accounting
Tools
Control of Meters
Visualization
Expense Reports
Introduction to the Expense Tracking Tool
Create/modify a fee countdown period
Modify Fee Count Settings
Add/Modify a General Expense Invoice in an Expense Report
Edit the deposits received from an expense statement
Specificity of heating and hot water production costs
Check and download meter readings for the billing period
Distributing and Generating Expense Summaries
Exporting Individual Consumption for the Expense Settlement Period
API
- Categories
- Contractor
- Commissioning
- Advanced Configuration
- Cloud Gateway Configuration (MQTT)
Cloud Gateway Configuration (MQTT)
Climkit portal configuration
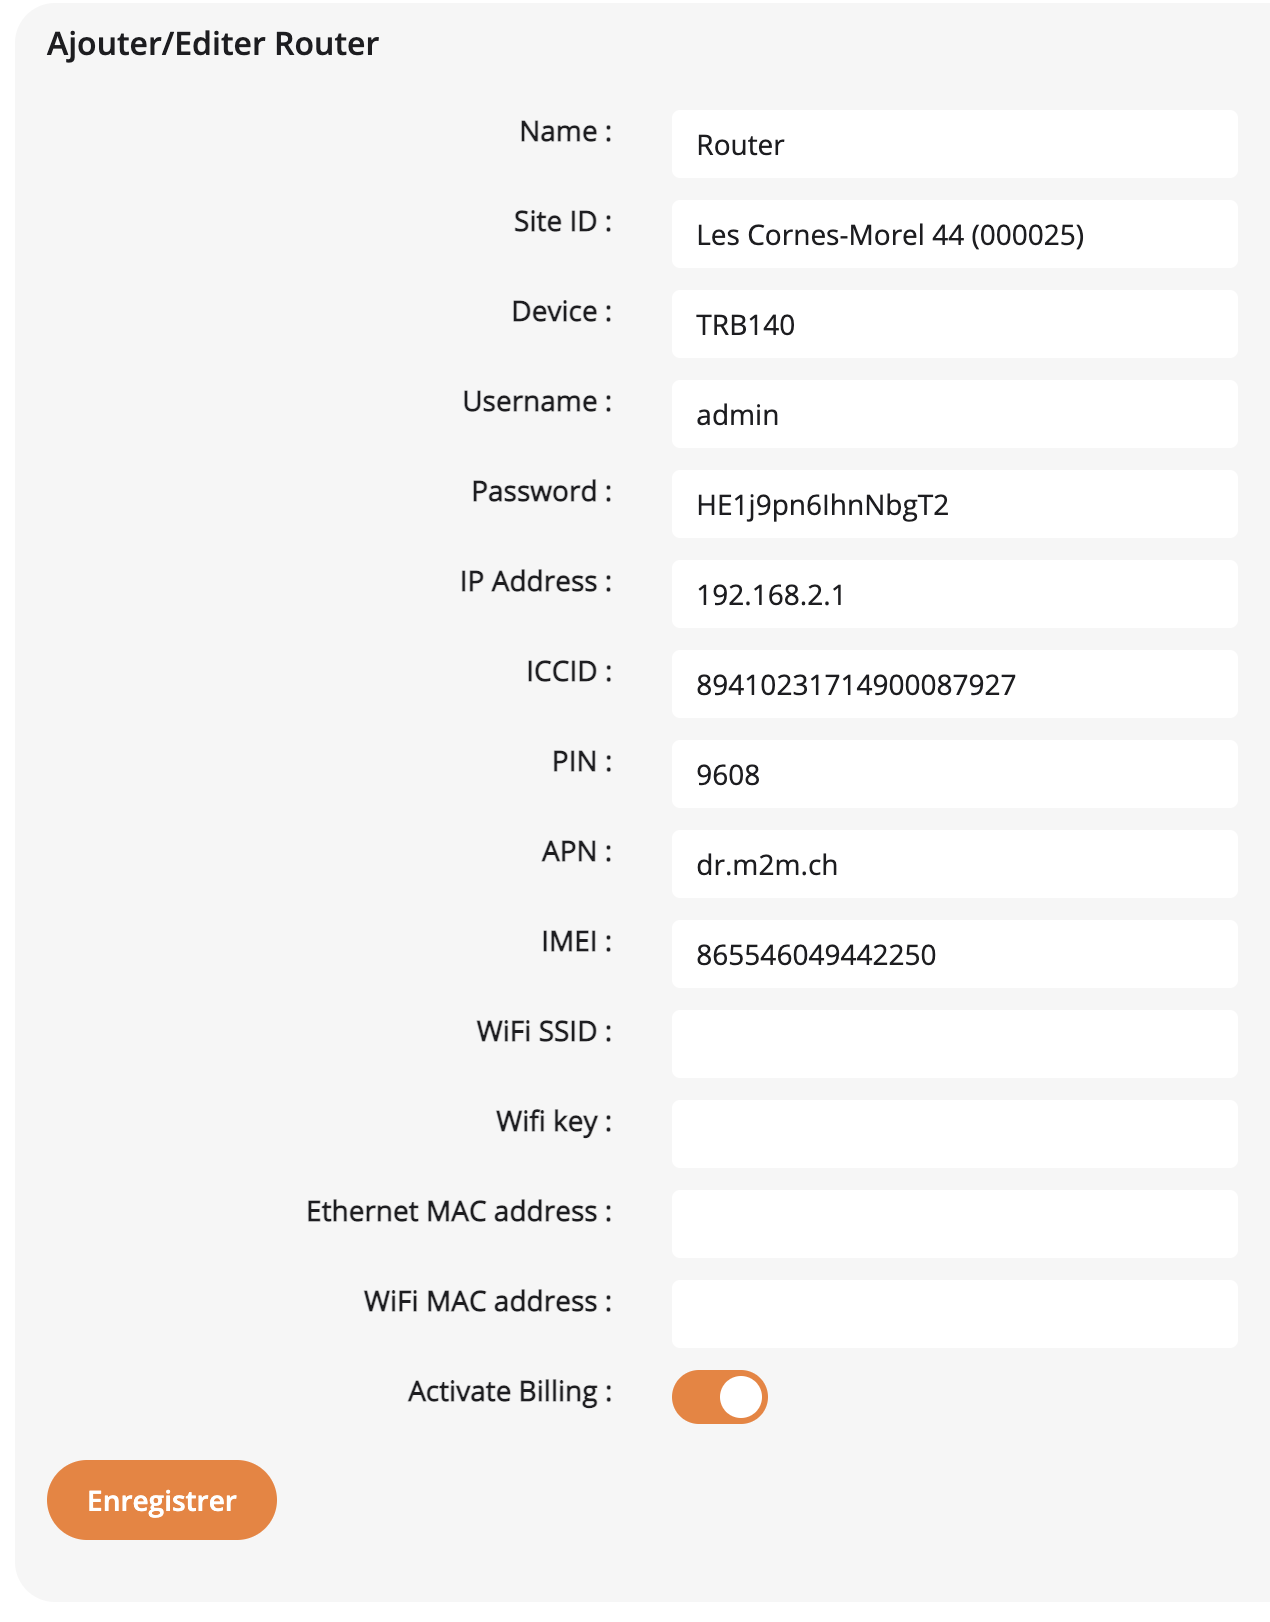
Add a router in the app for a specific site.
Fill out the necessary fields with the SIM card info:
PIN
PUK
APN
ICCID
Add a gateway with type mqtt
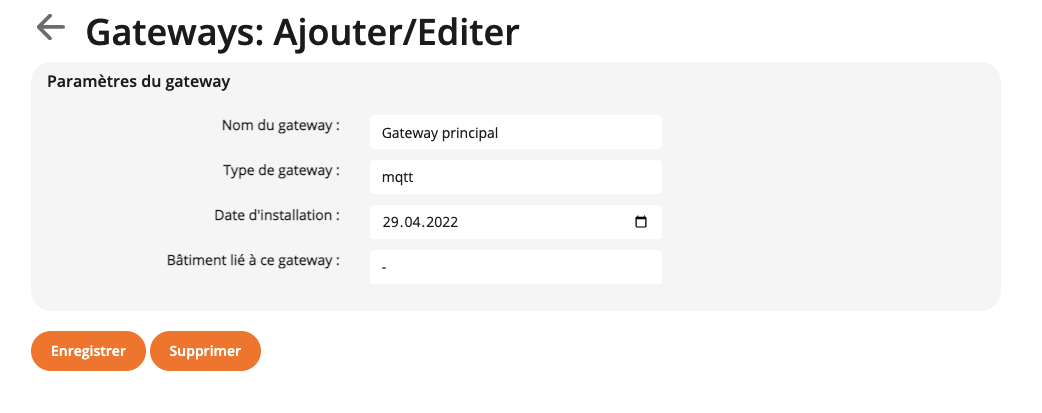
Add the default IP and port paramaters.
Add also a 4-digit PIN for the meters.
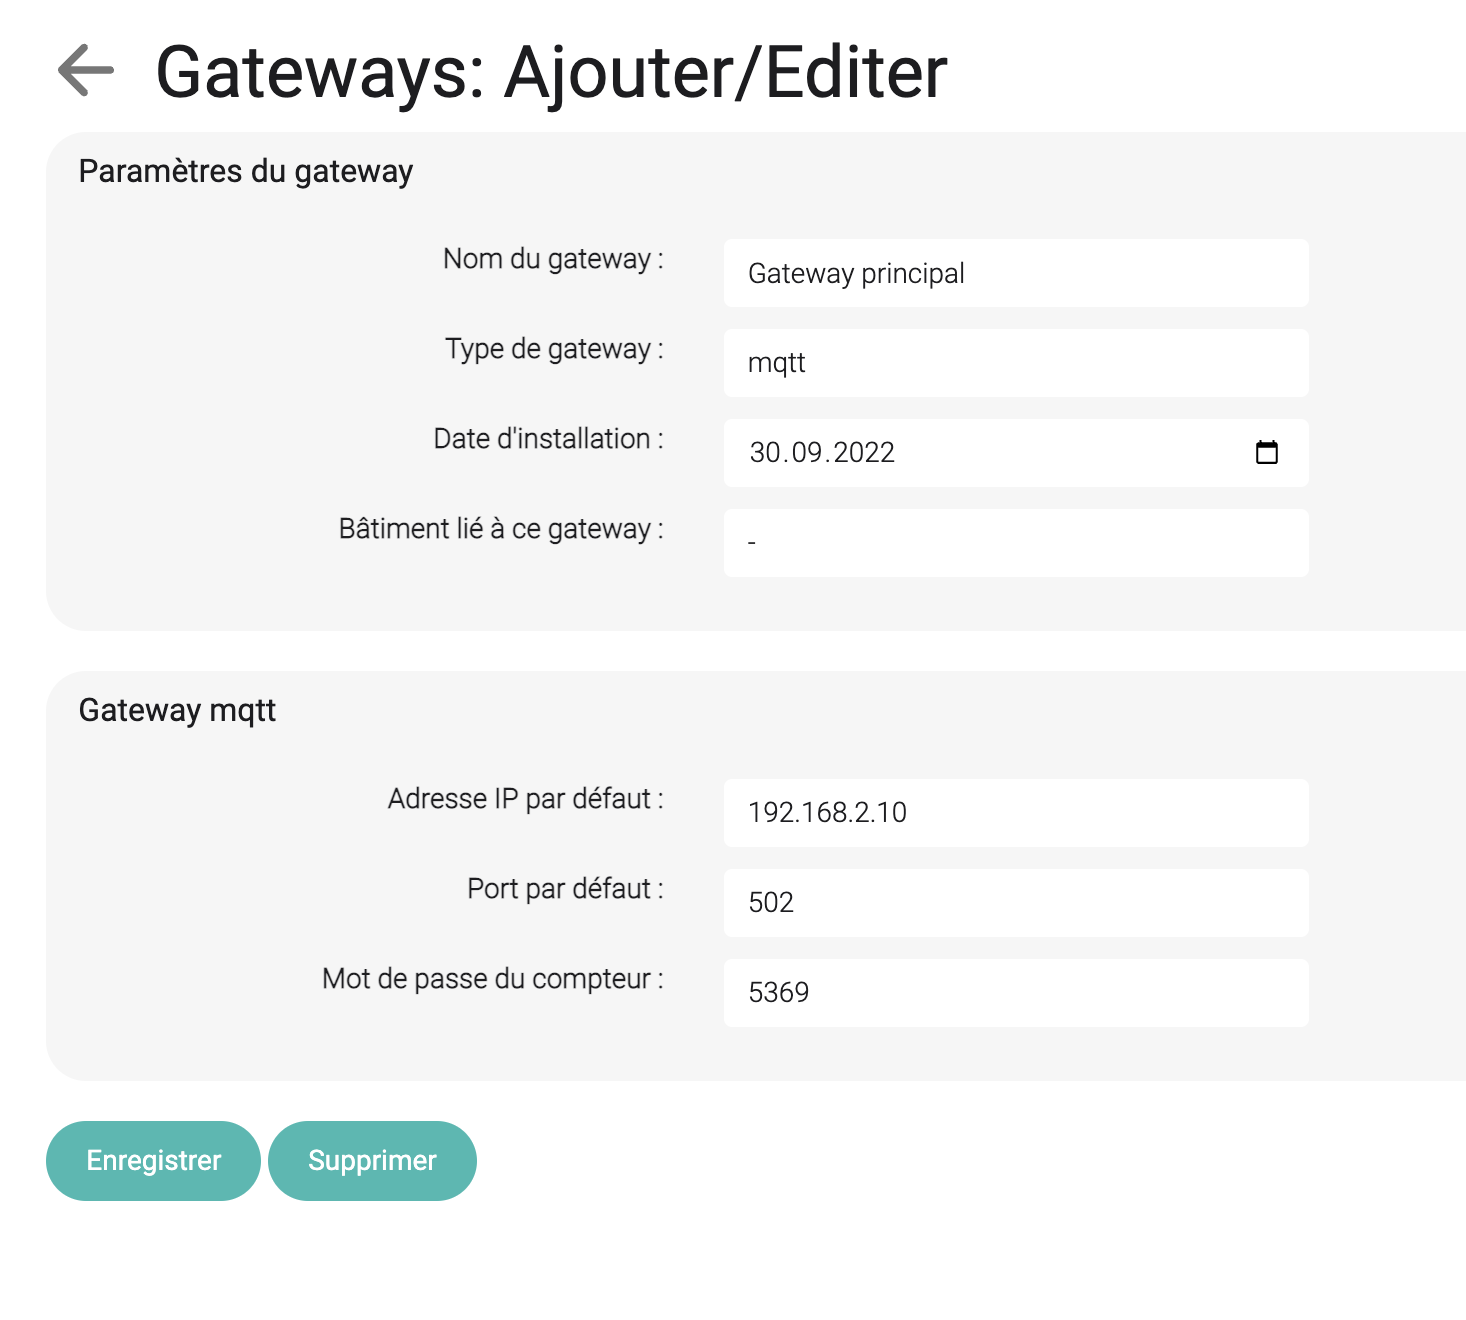
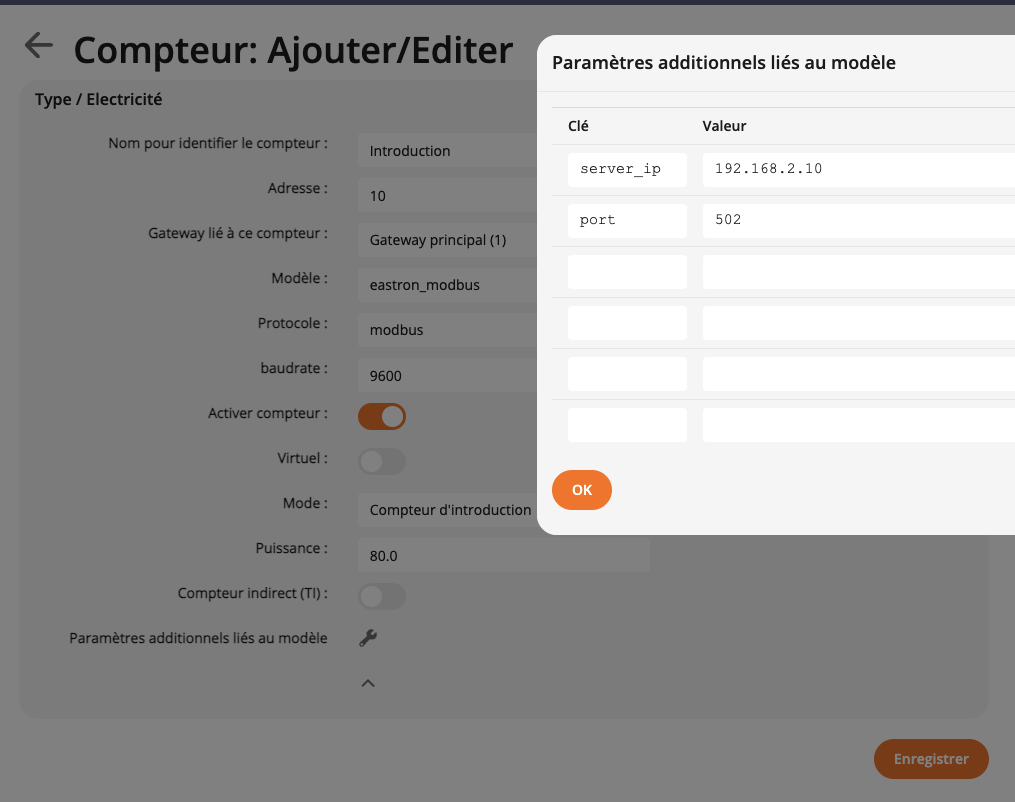
If you did not set a default IP and port above, edit each meter with the additionnal parameters:
server_ip: 192.168.2.10
port: 502
# Cloud Gateway (MQTT)
## Configuration
### Climkit portal configuration
Add a router in the app for a specific site.
Fill out the necessary fields with the SIM card info:
`PIN`
`PUK`
`APN`
`ICCID`

Add a gateway with type `mqtt`

Add the default IP and port paramaters.
Add also a 4-digit PIN for the meters.

If you did not set a default IP and port above, edit each meter with the additionnal parameters:
`server_ip`: `192.168.2.10`
`port`: `502`

### Router Teltonika TRB140
Insert an active SIM card in the Teltonika TRB140 router and power ON the router.
Follow the wizard to configure the following:
Configure the following:
- password (copy paste from climkit portal).
- Teltonika RMS:
Copy and paste the `Serial Number`, `IMEI` and site ID number (ex. CKT-00001). Save them on the Climkit portal.

Create a new device on the RMS portal and insert `Serial Number` and `IMEI`.
Click Submit. Go back to the router UI and click Connect:

- Update the router firmware
Click on FW VERSION on the top right of the screen > Flash New Firmware Image
Update from file and click BROWSE and select the latest image file from "module_image/teltonika" in Dropbox.
Current file name: `TRB1_R_00.07.02.1_WEBUI.bin`

- MQTT Configuration:
Switch to Mode: `ADVANCED`.
Enable: `on`
Host: `a215ef9d.eu-central-1.emqx.cloud`
Port: `15739`
Request topic: `meters/<gateway_id>/request`
Response topic: `meters/<gateway_id>/response`
Username: `dev`
Password: (saved in 1password as "EMX auth MQTT")

### RS485-Ethernet Converter
Static IP: `192.168.2.10`
Gateway: `192.168.2.1`

Baudrate: `9600`
Parity: `EVEN` (PRO380 meters) or `NONE` (Eastron meters)
Local Port Number: `502`
Work Mode: `TCP Server`

Check `Modbus TCP`

## Testing
This is how you can manually read a meter for testing purposes.

Example with PRO380 meter:


Example with Eastron meter:


Example with MTR80L-Modbus (Polier):

## Remote access
Connect to the [Teltonika RMS](https://rms.teltonika-networks.com/management/devices)
Click on the Device WebUI for the selected router and then Generate:


A link will appear below.